
How to create a Rocking Silhouette in Photoshop
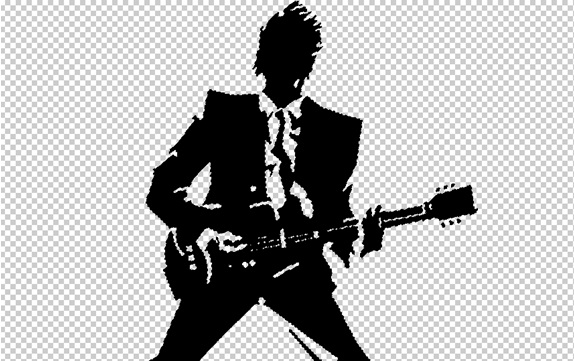
In this tutorial, we would learn how to use a basic silhouette image and merge it with various patterns and backdrops to make a completely new and improved composition. Before we start, let’s have a look at our final result.

Step 1: Selection
Download any silhouette image from the web and bring it on the canvas. Separate the image from the background using the lasso tool. Another way is to go to Select and choose the Color Range option. Choose the color white and it will automatically select the white color on your canvas. Hit Delete
Step 2: Background
Color the background layer black and make a fresh layer. Use the soft brush and choose a light maroon color. Increase the radius of the brush to cover the whole canvas and apply the brush at the center of the canvas. Change the blending options of the layer to Linear Dodge (Add). After that, make another layer and use the soft brush with a smaller radius and apply it on the middle of the canvas. Change blending options of that particular layer to Hard Mix.

Step 3: Layer Mask
Unhide the silhouette layer and apply the layer mask. After that, select the soft brush tool and apply it on the borders of the image. Play around with the idea a little bit, until you are comfortable with the output.
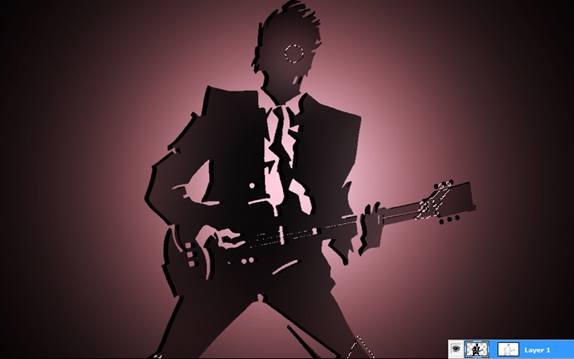
Step 4: Duplicate Layer
Duplicate the silhouette layer and position it behind the original layer. Move it a few pixels away from the original layer. Color the entire image white and decrease the opacity to 50% and go to the blending options and choose Overlay for this particular layer.

Step 5: Two More Silhouettes
Duplicate the original layer twice and move it a few pixels away from each other. Reduce the opacity of both the layers to 50% and select Overlay in the blending option of each layer.

Step 6: Wallpaper
Download any kind of wallpaper. This would be the basis of the overlay color that would be applied on the silhouette so be very careful about the colors in the image.
Step 7: Gaussian Blur
Choose the wallpaper layer and move to the Filter, select Blur and apply the Gaussian Blur effect. Keep the radius to 150px.

Step 8: Linear Burn
Duplicate the blurred layer. Choose one layer and change the blending options of that layer to Linear Burn.
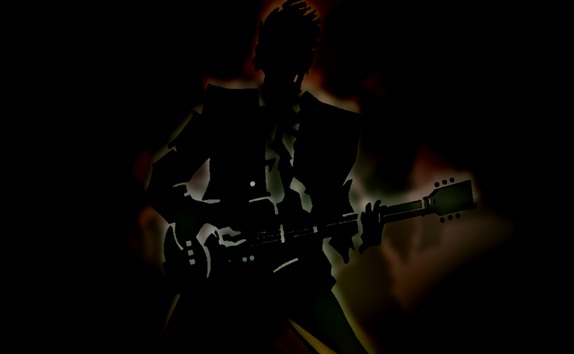
Step 9: Linear Light
Choose the second duplicated layer and change the blending options of that particular layer from normal to linear light.

Step 10: Pattern And Text
Download any patterned backgrounds and bring them on your canvas. Desaturate the layer by clicking CTRL U and setting the Saturation to -100. After that, choose Overlay in the blending options of that layer. Select the text tool and type in your text. Use Outer Glow from the layer style so that your text is easily readable. Change the blending options of the text layer to Overlay as well. We are all done now.


