Learn how to create gorgeous Disco Lines
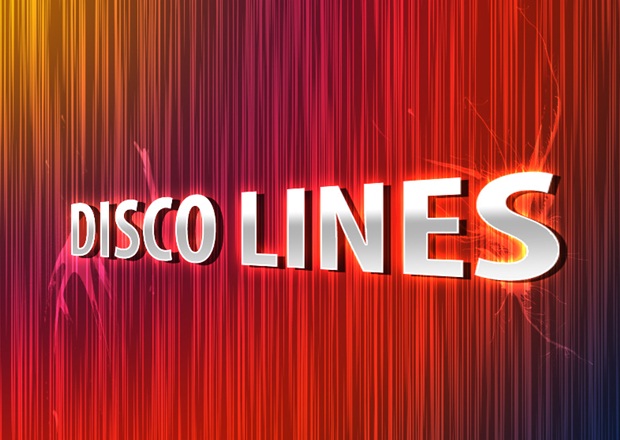
This is a simple tutorial that will help you to create gorgeous professional-looking colorful disco lines with the help of different Brushes and Blending Modes of Photoshop. We are aiming to produce something along the lines that displayed below so let’s get started.

Step 1
Create a new document, 800 by 600 px, using white background.
Step 2
1. Choose Pencil tool and draw a 1 pixel vertical line.
2. Now choose Eraser tool of 150px to erase the ends of this vertical line. You can achieve the same result using motion blur filter (90’) also.

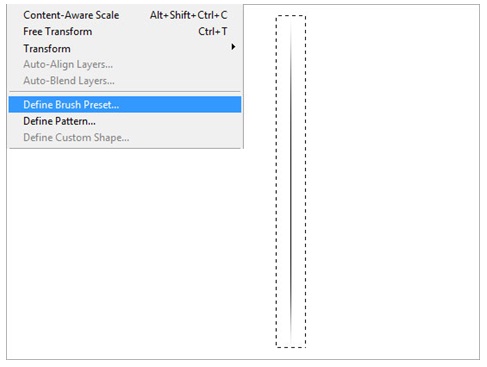
Step 3
1. Make ‘selection’ around this vertical line. Select ‘Edit’ option then go to ‘Define Brush Preset’.
2. Give this new brush any name you like.
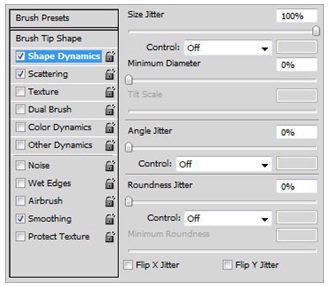
Step 4
1. Choose ‘Brush tool’ and go to the ‘Brush Palette’.
2. Click on ‘Shape Dynamics’ and rest of the settings should be like shown below.
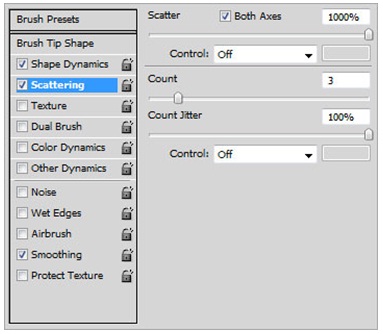
3. Click on ‘Scattering’ option and rest of the settings should be like displayed below.
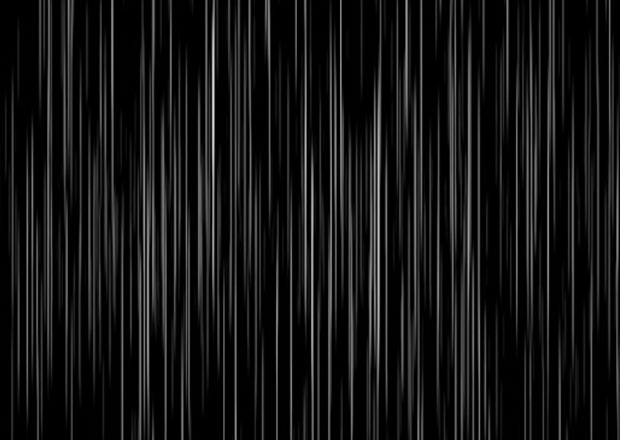
4. Fill in black color to the Background layer of this document.
5. Choose ‘Brush tool’ now, foreground color should be white.
6. Now choose the brush you’ve created before. Hold the left mouse and move over the document.
Step 5
1. Below the vertical lines layer, you have to make a new Gradient Fill adjustment layer.
2. Adjust the gradient according to as displayed below, or else you can select any color you like to choose.

3. Create a fresh layer and re-do the same steps to brush more of these vertical lines.
4. Now the ‘Blend Mode’ of these 2 layers of the vertical lines should be set to Overlay.
Step 6
1. Choose the ‘type tool’ and add some Text.
2. Click on ‘Edit’ go to ‘Transform’, right click and choose ‘skew or perspective’, and resize the text as displayed underneath to give it a perspective.

Step 7
1. Apply gradient effect on your text layer, select colors as presented below.

2. Duplicate your text layer and move your lower copy 1 px towards the right.
3. Repeat this 10 times and all of the 10 layers together.
4. Retitle this merged new layer as shadow.

Step 8
1. Create a fresh layer underneath the text layer and label it as Abstract Glow.
2. Select white as foreground color and paint in few abstract glowing strokes.
3. Adjust Blending Mode of this new layer to Overlay.

Step 9
Now behind the text layer draw some brush strokes and adjust the blend mode to color dodge.
Step 10
Give your text a white stroke of 2 pixels, and you are done. If you want to add drop shadow then go for it.